Sharing tracing techniques

Perhaps it is worthwhile composing a FAQ on how to handle common complex scenarios, and techniques how you can be more certain about the correct result.

One common scenario I've often encountered is when tracing really thin dendrites, determining whether they continue or whether it is a new dendrite starting after 'the gap'Yesterday I found out about a feature which isn't that well documented, which helps out perfectly in this scenario. When holding down ALT-SHIFT and dragging on the 2D view, you can change the orientation of the slices. It is really helpful getting a different view on what you are looking at when you are in the given situation.

In general it's easiest to trace a dendrite when using a cross-section. This gives you the clearest view on any possible branching dendrites, and allows you to work a lot faster since the borders tend to be more crisp/well defined than in longitudinal sections. However, when trying to determine whether or not a dendrite continues it is best to use a longitudinal section. Using this view the border between two distinct dendrites can become a lot clearer.

I've already traced 229 cubes, so I consider myself to be pretty good in recognizing branches. Only yesterday I found out about this feature, and today I found a branch by being able to switch to a cross-section which I otherwise would never have found. This feature deserves more publicity, and additionally usability might need to be considered as well. I have no clue whatsoever how I need to drag it where to switch to my desired view. I recommend adding axes on which you can click as in e.g. Unity 3D. (I'll write up a feature request.)

Excellent! Agree - many of these tips are hard to remember once you get into the game. Would you be willing to create a tutorial video on Alt+Shift? 

I’m not a real youtube guru, so I will leave that to somebody else. :slight_smile: 
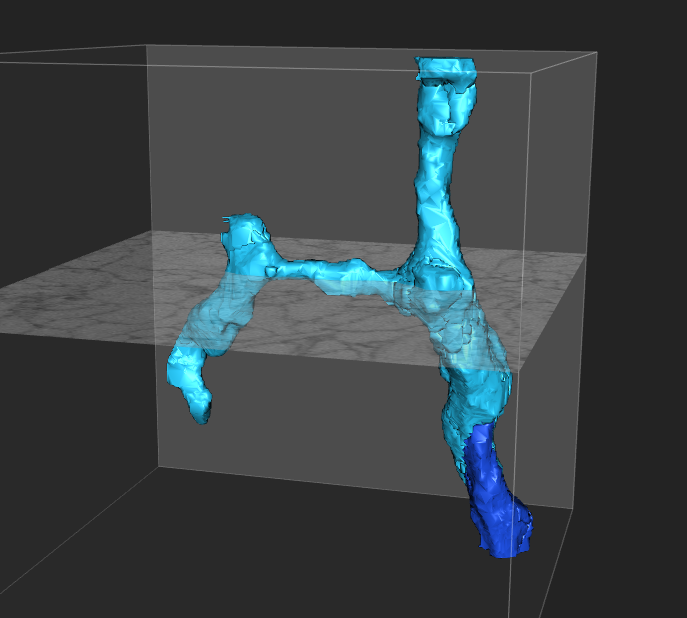
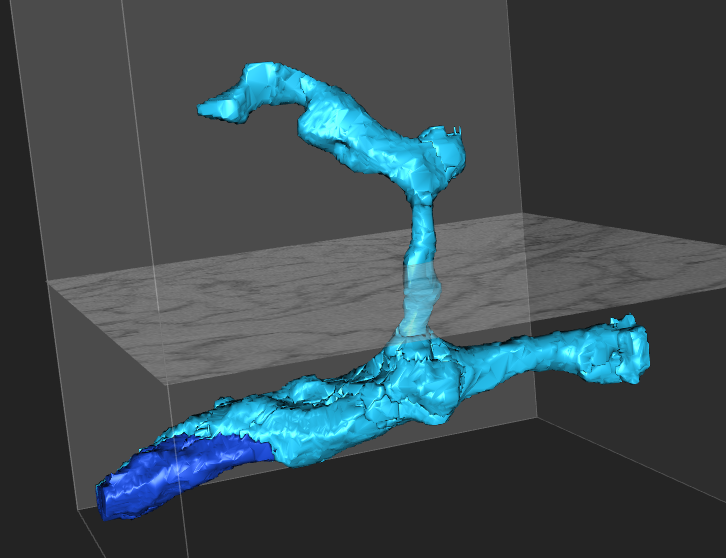
I can provide some screenshots however to better visualize what I am talking about.


The following task I didn’t start out in the orientation as displayed below, but I rotated in order to have a clear cross-cut with the direction of the starting stump of the dendrite. Once I passed the branch, it was easy to see that it was in fact a branch. (longitudinal cut)


In order to better trace this branch, it’s useful changing orientation again to have a cross-cut, as before:


One last note. The problems I had with rotating the orientation seemed to be related to using ALT-SHIFT. If I just use ALT-drag, everything moves a lot smoother. A better sense of orientation could still be given though, but at least the interface doesn’t stutter and hang completely.

One other trick, try setting the paint opacity as low as possible. Turning it up too high (which it is set to by default) often results in not noticing borders between dendrites. When unsure, turn the opacity off and scroll through the segment again.

I also found this view change while looking at the help section - the question mark with the circle symbol at the bottom right as you work.


I’m not savvy enough to do a video, but if you need a reminder on what to do, just look in the corner. You don’t need to come back to the forum to be reminded. 

I hope that helps some people.

Excellent! Thanks, What the code for the screenshots! Claire is going to make a tutorial on this. Also thanks Kali for the comment.


One other trick, try setting the paint opacity as low as possible. Turning it up too high (which it is set to by default) often results in not noticing borders between dendrites. When unsure, turn the opacity off and scroll through the segment again.

You can also hold shift to toggle the paint on/off.